
Home Assistant + UniFi Protect: camera-driven automations
Home Assistant can react to Protect detections in two ways. The official UniFi Protect integration turns every camera's detections into sensors and events. Alternatively, Protect's Alarm Manager calls a Home Assistant webhook, so Protect's own zones and schedules decide when to fire.
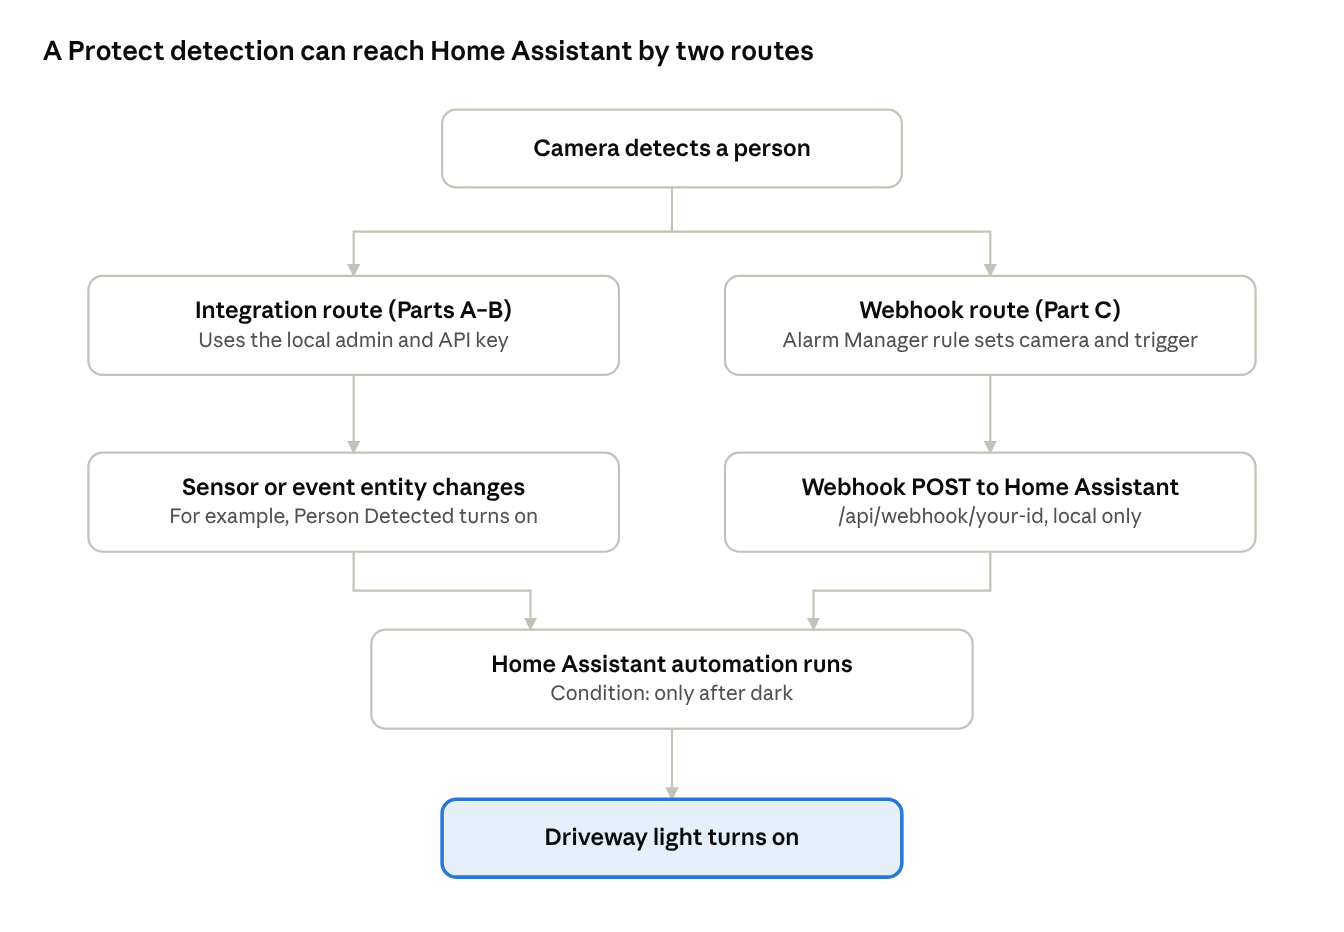
Protect to Home Assistant: two routes, one automation
The integration route (Parts A and B) works for every camera once it's connected. The webhook route (Part C) lets a Protect rule filter detections before Home Assistant hears about them.
You'll need
- A UniFi OS console (not self-hosted Protect) on an Official Protect release, 7.2.105 or newer. Home Assistant doesn't support Early Access or Release Candidate builds.
- Home Assistant 2025.8 or later, which added the API key to setup.
- An admin account on the console, to create the local user and API key.
Part A: Connect the integration
- Create a local user for Home Assistant. Open the console's local portal by IP address, not unifi.ui.com. Go to Admins & Users › Admins › + › Add Admin, tick Restrict to local access only and set the Protect role to Full Management. Ubiquiti cloud (SSO) accounts don't work.
- Create an API key. Still in the local portal, open UniFi Protect › Integrations › Create API Key, and copy the key somewhere safe.
- Enable camera streams. In Protect, turn on an RTSPS stream for each camera you want to watch in Home Assistant. Without one, the live feed falls back to repeatedly refreshing snapshots; Home Assistant offers a repair that turns a stream on for you.
- Add the integration. In Home Assistant, go to Settings › Devices & services › Add Integration › UniFi Protect. Enter the console's IP address, the local user's username and password, and the API key.
- Check the entities. Each camera gets a camera entity, binary sensors (Is Dark, Motion Detected and one per smart-detection type) and event entities for motion, smart detections and doorbell rings. Note the exact entity IDs on each camera's device page.
You can connect with the API key alone, but you lose actions, the media browser and doorbell-ring events. The local admin plus API key gives full access.
Part B: An automation from the integration's sensors
This example turns on the driveway light when a person is detected after dark, and turns it off once nobody has been detected for five minutes.
alias: Driveway person after dark
triggers:
  - trigger: state
    entity_id: binary_sensor.driveway_person_detected
    to: "on"
    id: person
  - trigger: state
    entity_id: binary_sensor.driveway_person_detected
    to: "off"
    for: "00:05:00"
    id: clear
actions:
  - choose:
      - conditions:
          - condition: trigger
            id: person
          - condition: state
            entity_id: binary_sensor.driveway_is_dark
            state: "on"
        sequence:
          - action: light.turn_on
            target:
              entity_id: light.driveway
      - conditions:
          - condition: trigger
            id: clear
        sequence:
          - action: light.turn_off
            target:
              entity_id: light.driveway
Replace the three entity IDs with your own. The second trigger fires only once the sensor has stayed off for five minutes, so the light stays on while someone lingers, and each new detection restarts the countdown.
For finer control, trigger on the camera's smart-detection event entity and check that its event_type is person. Filter on event_source as well, or one detection can fire the automation several times.
Part C: Let Protect call Home Assistant with a webhook
- Create the Home Assistant side first. Start a new automation with a Webhook trigger and give it a long, random webhook ID. In the webhook settings, keep Only accessible from the local network on and allow the POST method.
-
Create the alarm in Protect. Open Alarm Manager › Create Alarm and set:
- Trigger: Person. Vehicles, animals, packages, faces, plates, line crossing and doorbell rings work too.
- Scope: your driveway camera.
- Schedule: Always, or a custom night-time schedule.
-
Action: Webhook › Custom Webhook, with the URL
http://<home-assistant-ip>:8123/api/webhook/<your-webhook-id>. - Advanced Settings: change the method from GET (the default) to POST.
- Optionally tick Ignore Repeated Actions, then click Create.
- Finish the automation. In YAML it looks like this, with your own webhook ID and light:
alias: Driveway person (Protect webhook)
mode: single
triggers:
  - trigger: webhook
    webhook_id: driveway-person-REPLACE-WITH-A-LONG-RANDOM-ID
    allowed_methods:
      - POST
    local_only: true
conditions:
  - condition: state
    entity_id: sun.sun
    state: below_horizon
actions:
  - action: light.turn_on
    target:
      entity_id: light.driveway
Protect's alarm has already checked for a person on the right camera, so the automation only checks that it's dark. Protect sends a JSON body describing the alarm and its triggers, which templates can read as trigger.json.
Check it worked
- From a computer on your network, run
curl -X POST http://<home-assistant-ip>:8123/api/webhook/<your-webhook-id>, then open the automation's trace. - To see what Protect actually sends, temporarily add a notification action that prints
{{ trigger.json }}. - Do a walk test after dark for both automations.
Watch out for
- Mismatched methods. Protect's webhooks default to GET, while Home Assistant webhooks only accept POST and PUT unless you add GET to the allowed methods.
- One automation per webhook ID. A second automation can't share it.
- Alarm entities can disappear. Adopting UniFi sensors switches Alarm Manager to Global mode, which hides Home Assistant's alarm panel entity.
- Replayed events. Detections can be processed again after a camera reconnects. The integration docs show guard conditions that prevent repeat firing.
Keep it secure
- The webhook ID is the only password. Make it long and random, never copy one from a blueprint, and don't use webhooks for locks or garage doors.
-
Keep
local_only: true. If the console and Home Assistant sit on different VLANs, allow only the console's IP to reach Home Assistant on TCP 8123 (see our VLAN guide). - Use a dedicated local-only account. Store the API key like a password.
Sources: Home Assistant UniFi Protect integration · Home Assistant automation triggers · Home Assistant 2025.8 release notes · Alarm Manager · Protect webhooks
Disclaimer: This guide reflects UniFi software and official documentation as of 22 October 2026. Menus, features, plans and policies change, so check each step on your own equipment and back up first. It's general information, not legal advice, and you use it at your own risk. UniFi is a trademark of Ubiquiti Inc., and other names belong to their owners.